Mushroom pasta

20170528_123932.jpg

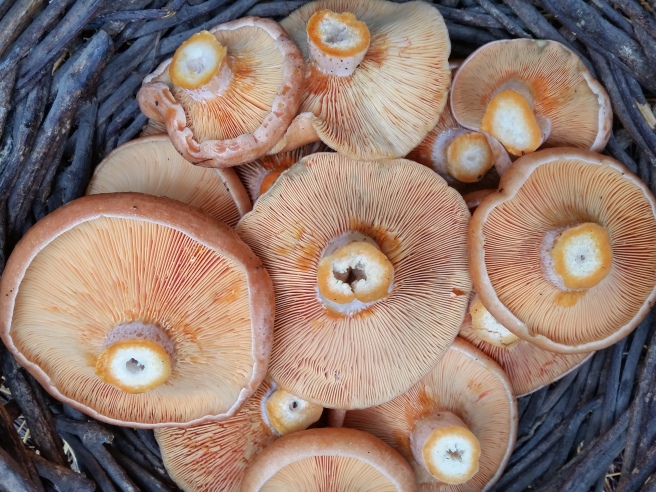
Mushroom season has started a little late this year. There were some around in early May but I’ve been waiting for the cooler days and the rains to come for them to really start cranking. The Lactarius deliciosus, also known as Pine mushrooms or Saffron Milk Caps are a plentiful mushroom that very easy to find at this time of year. I like to pick them very young when they haven’t been eaten by any other critters. As the Latin name gives it away, they’re delicious. These ones will be cooked up using the following recipe using wonderful South Australian produce. It’s also pretty exceptional when eaten with lovingly made homemade pasta.

8 garlic cloves, finely grated

2 red onion, finely sliced

1 tablespoon Murray river salt

750 grams pine mushrooms, sliced

125 grams b.d farm butter, diced

1/2 cup extra virgin olive oil

cracked pepper to taste

1/2 cup Adelaide Hills white wine

1/2 cup flat parsley, chopped

500 grams cooked pappardelle L’Abruzzese pasta

Preheat a pan to a high heat. Add garlic, onion, salt, pepper. Top with mushrooms then finally add cubes of butter and pour the oil. Cover with a lid and cook on high heat for 5 minutes without stirring. Uncover then add the wine and stir to combine. Reduce the heat and simmer for 5 minutes. The mushrooms should still be firm but cooked through.

When ready add parsley and stir through cooked pappardelle pasta to serve.

Roasted chestnuts

IMG_20170513_091622_455.jpg

I love talking about food almost as much as I like eating it. The other night a friend came over for dinner and we started talking chestnuts. I was keen to get my hands on some fresh local ones. Turns out after 18 years of friendship I had no idea this friend doesn’t like chestnuts but can get them easily from a neighbour that doesn’t like them either. A few days later some chestnuts turned up on my front door step. I also found in my travels a row of chestnut trees growing along a fence dropping nuts on the side of the road. Needless to say I was sorted for chestnuts.

The ones in the supermarket are often not stored properly and can be mouldy. They need to be stored at around 0 degree celsius and will keep for a year and still be as fresh as when they fell off the tree. This is my go to recipe for roasted chestnuts and the way I love eating them.

Preheat the oven to the hottest it will go – mine goes to 230C. Chestnut husks wrap around the nuts like a cactus. Use some strong leather gardening gloves to pry the nuts free. You can also stomp them with your feet and crush the husk off if you don’t have thick gloves. Give the nuts a decent cut about half way through, across the middle of the domed side. Place nuts in a cake tin about one deep. Then add water to almost cover them. Give them a generous sprinkling of Murray River pink salt and roast for about 10 mins. You’ll know they’re ready when the shell peels back off the inner kernal. If you don’t like the flavour of the inner skin they can be boiled a bit longer to make it easy to remove. Peel off the shell and eat while still warm. Enjoy!

Scrap vinegar

IMG_20170506_232846_717.jpg

This long wet summer has seen a bumper crop of apples. This tree grows by a creek near a friends house. I collected from it last year and grabbed some again this year too. I’m experimenting with different apple recipes to use up this autumns abundance. Drying them has been an easy way to preserve. A few weeks ago my neighbor gave me a big crate of golden delicious apples and I made fruit leather with them. With the left over cores and peels from the apple leather I had a go at making scrap vinegar. It was pretty simple and turned out great! A few things to remember before starting:

  • use a sterilised jar
  • use organically grown and ideally freshly picked apples so that the good microbes are present to begin the fermenting process
  • if you’re using town water let it sit overnight before attempting the recipe to let some of the chemicals to evaporate from or it might kill the good microbes and not ferment.

Scraps of 12 apples, cores and skins

2 tablespoons raw sugar

8 cups water

optional, 1/2 cup of apple cider vinegar with mother

Remove any bruised and damaged bits of the fruit. Place in all ingredients in the jar and give a good stir. Cover the mouth of the jar with a thin piece of cloth and secure with a rubber band. I added a few drops of apple cider vinegar to the cloth to sterilize the cloth and to inoculate it with good microbes. The scrap cider needs to breathe while fermenting.

Stir it once or twice a day when you remember to with a clean kitchen spoon. It should start bubbling and frothing as it ferments. A few days later it should taste like sparkling cider. You could probably strain and drink it at this point it’s pretty nice. I left mine in the jar for almost 3 weeks. If you bottle it too early it might keep fermenting which will then risk explosion if using glass. Wait until all the fruit has sunk and all the fermenting action is over. Then strain the scraps from the liquid and store in sterilized bottles in pantry for up to a year.

If you detect any fizz after bottling make sure you burp the bottle so it doesn’t explode. Burping just involves opening and closing the bottle to let the gas escape. It’s not as acidic as apple cider vinegar made from apple juice but is still pretty good.

20170514_140629

Pickled Jalapeño

IMG_20170417_162712_369

Inspired by my sister in law growing and pickling jalapeño chilli’s I decided to give them a go in my garden. These are a perennial plant so I’ll leave them in and see how they go next year.

18 jalapeño

1 cup apple cider vinegar

1 cup water

2 tablespoons raw sugar

1 teaspoon salt

Sterilise a small jar and lid, put aside. Slice the chilli’s into rings and put aside.

Place water, vinegar, sugar and salt into a small saucepan on medium heat. Using a whisk stir until the salt and sugar are dissolved. When dissolved add the sliced chilli and gently cook for 5 minutes.

Using a slotted spoon take the chilli’s out of the pan and put into the jar. Then add the vinegar mix over the chilli’s until the jar is full. Wait until cool then place lid on and store in fridge.


Apple, peach and strawberry leather

IMG_20170417_103451_018

My neighbour over the back fence grows golden delicious apples. His tree is 27 years old and he grafted it himself all those years ago. I asked him ‘how did you learn to do this?’ to which he replied ‘I am from la campagna, from the land, not the city. It’s in my blood to do this’. I always try to learn as much as I can from him as he’s 80 years old and has been food gardening next door for over 30 years. His tree is heavily laden with fruit and he hands me over a crate of apples that fell to the ground that morning. I urged him to give them to family as we have heaps already. He wouldn’t take no for an answer as he gets so many from the tree he needs to make sure they will be eaten and used.

These ones all had a big bruise on the side they hit the ground and some had cracked from the force of the drop so they needed to be eaten pronto. I didn’t have time to preserve in jars so I decided to make fruit leather with them instead. I had four peaches that needed to be eaten soon as well as half a punnet of strawberries in the fridge. I made three different leathers all using the apple as a base.

12 apples

4 peaches

1/2 punnet strawberries

Chop off any bruised or damaged bits and put in compost or give to the chooks.

Peel and core the apples. Don’t throw the peels and cores out, save them to make apple scrap vinegar.

Chop up the rest roughly and place into a large heavy based pot. Add a splash of water and put the stove on a medium heat. Add a lid. What you want is the apples to start softening so that you can use a stick blender to make into a puree. Once you have the puree use this as the base to blend in other flavours. No need to be precise with measurements but you do want enough of the other ingredients flavour to shine through.

Place baking paper on the dehydrator trays and add the puree. This was enough for 6 trays. Dehydrate on 70C for 7 hours. When finished let it cool. They should be able to be peeled off the baking paper without sticking. If they are still a bit wet or sticky put them back in the dehydrator for longer. To serve roll them up and slice into short lengths. Store in jar.


Pear chips

IMG_20170415_164935_331

A few months back I was driving in the Adelaide Hills and had to take a detour because the road was closed. That detour took me past a few pear trees planted on the side of the road. They weren’t ready yet so I headed back a few weeks later to check them again. Pears are a bit tricky to work out when they’re ripe because they don’t ripen on the tree.  If you wait too long they drop off the tree and they may also rot in the middle too if left too long.

The only test I know to see of they’re ready is to lift the fruit at a 90 degree angle and if the fruit easily comes off then you are good to go… but not quite yet. You need to wait at least another two weeks for them to ripen. Mine took closer to four weeks and the wait was unpearable! When they were finally ready I realised that they weren’t any good for eating raw. They were very dry and sour so needed cooking to bring out the sweetness in them.

I made an upside down pear cake with these pears and it turned out great, but these pear chips were amazing. To make pear chips, wash them well and dry. Then slice thinly and lay out in single layer on a tray. I baked these in a oven at 100C for a few hours until they were semi dried. I wanted them a bit chewy still but they can be dried for longer in a dehydrator for longer preservation. Can eat as a snack but I made these to add to a locavore platter.

Beetroot top gozleme

IMG_20170401_105234_693

It’s beetroot season and they can be used in so many ways. I love them in borscht soup, beetroot dip, or baked and added to a hearty salad. The tops can be used like spinach and are best cooked, not eaten raw.

I pulled more beetroots out than normal to make room for some kale seedlings. I find the tops wilt quite quickly so need to be cooked up fairly soon after harvesting. These tops are perfect for my easy gozleme.

2 tablespoons b.d farm butter

1 red onion, finely sliced

2 gloves garlic, grated finely

1 teaspoon cumin, or fennel seeds depending on your flavour preference

8 beetroot tops, leaves and stems washed well and chopped

cracked pepper

1/4 cup water

4 large or 6 small wholemeal flatbreads

100 gm b.d farm feta, or swap out for a vegan cheese

40 gm walnuts, chopped and toasted

olive oil

Melt butter in large frypan on medium heat. Stirring regularly, add onion and cook for 5 minutes until soft. Add garlic and cook for 1 minute. Then add cumin and cook for another minute. Add beetroot tops and water and cover for 10 minutes. check occasionally to make sure it’s not sticking or burning.

Take lid off and add pepper, using an egg flip press down on the mix and try to cook out as much of the liquid as possible. Once its fairly dry take out of pan and put on a plate. Crumble some feta into a bowl. Add the toasted nuts a bowl.

If you have a sandwich press put this together like a big giant toastie. If you don’t just use a frypan and prepare as follows. This will make 3 using the small flatbreads or 2 using the large.

Get a pastry brush and brush one side of the flat bread. Place the oiled side down then place a portion of the beetroot top mix, then some feta then some walnuts. Add another flat bread on top and use the pastry brush to oil the top. After a couple of minutes flip it over and toast the other side for a couple of minutes. Once cooked, place on chopping board and chop into quarters for serving.

gozleme

Apple and walnut cake

20170318_131700

Apple season is starting soon. They happily grow in this climate with lots of backyard trees as well as many delicious foragable trees available. They grow along roadsides and old train lines, most likely popping up from the seeds of cores people have thrown out windows. We have two very old large apple trees in the back yard which we share with the birds. This year we’ve had a bumper crop and will need to work out multiple ways to eat, prepare and share the bounty.

150 gm b.d farm butter

150 gm coconut sugar

1 teaspoon vanilla essence

2 eggs

150 gm wholemeal spelt flour

1 teaspoon baking soda

1 teaspoon baking powder

1/2 teaspoon ground cardamon

1/2 teaspoon ground cinnamon

pinch salt

400 gm apple, cored then grated

60 gm walnuts, lightly toasted then chopped

Topping:

60 gm walnuts, chopped

30 gm coconut sugar

1 teaspoon ground cinnamon

Preheat the oven to 180C. Get a loaf tin ready by lining it with baking paper. Beat together the butter and sugar until well combined. Add the eggs one at a time beating them in until well combined.

Add sifted flour, baking soda and powder, spices, salt. Use a wooden spoon to fold in the ingredients until just combined. This will result in a fluffier lighter cake.

Add the grated apple and walnuts and fold in. Place mixture into loaf tin. For the topping mix all the ingredients together in a bowl then sprinkle evenly over top of cake.

Bake for 45 mins or until skewer poked in middle comes out clean.


Crabapple jelly

CRABAPPLES

Crabapples are the cutest little fruit, looking just like a miniture apple. They ripen just before their relatives the apple. They’re tart when eaten fresh but the flavour can be mellowed by stewing them. Once stewed they can be run through a food mill to remove the seeds and used like apple puree. They’re high in pectin and a pectin stock can be made with them to use throughout the year for other jams and jellies. They would be good to mix with blackberries which are in season at the moment but low in pectin. Like regular apples these come in all sorts of colours and flavours and the green ones are the most tart. I foraged these from a tree at the local youth centre. They were just dropping on the ground so I figured it was ok to pick some from the tree.

Crabapple jelly recipe

Crabapples

Water

Sugar

Soak the fruit in a sink with hot water and about a cup of vinegar. This will lift off any dirt and clean the fruit. Remove any bruised fruit. No need to cut the fruit, just rinse and then place in a heavy based pot. Add just enough water to cover the fruit. Bring to a boil and a rolling simmer for 30 mins. It’s ok if it cooks a bit longer, you just want it soft and for the flavour and pectin to release in the water.

Once it’s cooked set up a strainer over a large bowl and line it with a clean cloth. I used calico but any clean cloth will do. Place a small plate into the strainer to stop the big particles pushing through the cloth. This will result in a clearer jelly. Pour all the crapapples into the strainer and carefully remove the small plate. Don’t gather up the sides of the cloth and squeeze or you will get cloudy jelly. Leave to drain into the bigger bowl overnight. In the morning I had a delicate pink coloured opaque liquid from this batch. I kept mine in the fridge until I was ready to do next step the next day.

At this point instead of continuing with making jelly you could freeze the liquid in 1 cup batches and use as pectin stock later. You will have left over stewed fruit which can be run through a food mill and use like an apple puree.

Back to the recipe – when ready add 1 part crabapple liquid to 0.7 parts sugar. I used 1 cup to just over 2/3 cup sugar. Bring to a hard boil for at least 10 minutes to help it reach setting point. Do the plate test to check if it’s ready. Try to put in the sterilised jars straight away or it will start setting in the pot. If you pour it in down side of jar you won’t get air bubbles in it like I have in the picture below. Preserve by giving the sealed jars a bath for 10 mins then cook and store in dark cupboard. Eat within the year.

And here’s the finished result – crabapple jelly.

finished jelly

Macadamia mylk

MYLK

It’s a moment that I chase everyday while growing and foraging my own food. It’s the moment my mind is blown by the flavour of what I’m eating. I had one of these moments drinking some homemade macadamia mylk. I’m sure it was because the macadamia nuts were so fresh. They dropped off the tree a week ago and were cracked open to make this recipe.

Macadamia mylk recipe

1/2 cup raw macadamia nuts

water for soaking

500ml water

pinch of salt (optional)

1 medjool date, take out pip (optional)

  1. Crack open nuts. Rinse the nuts well to make sure they are clean. Soak in water for 2 hours make sure they are covered well and there is some space for them to expand a little. Take nuts out of the soaking water, drain and rinse well. Discard soaking water.
  2. Blend nuts and 500ml fresh water for one minute, I use a nutribullet. There’s no need to strain when finished. Bottle and keep in the fridge.
  3. If you want a sweeter mylk add the medjool date and include when doing step 2 above.