Native Juniper

Hindmarsh Island seems to be covered in Myoporum insulare. While the fruit is edible it does have a strong gin like flavour which puts me right off. Juniper happens to be a key flavour of gin which I think is one of those spirits you either love or hate. There is a small boutique distillery on Kangaroo Island making gin with the the Native Juniper. On all accounts if you are a gin fan they are producing gin that is up there with the worlds best.

Juniper berries are also a traditional ingredient added to sauerkraut. As cabbage season is months away these berries could be preserved for using later on possibly by drying. They could also be used in meat and game recipes as you would use European Juniper berries.


Karkalla

karkalla-fruit

Karkalla (Carpobrotus rossii) is an abundant summer fruit that should be part of every Adelaide garden. I have some growing in my front garden as a ground cover but it has never fruited. It does have cheery iridescent purply pink flowers and puts on a great show each year so for now it stays. It likes sandy soils and can survive off rainfall.

While down in Goolwa the other day I saw it growing everywhere. I saw some growing in a half wine barrel spilling over the sides which seems like a good use of space in the garden. To harvest the fruit it will be pink or reddish colour when ripe. Pinch from where the fruit attaches to the plant being careful not to squeeze the body of the fruit. Then hold the open end in your mouth and squeeze the other end. The fruit will then pop out. It tastes a bit like mandarin with a kiwi fruit texture and slight salty hit at start.


Mallow

mallow-seeds

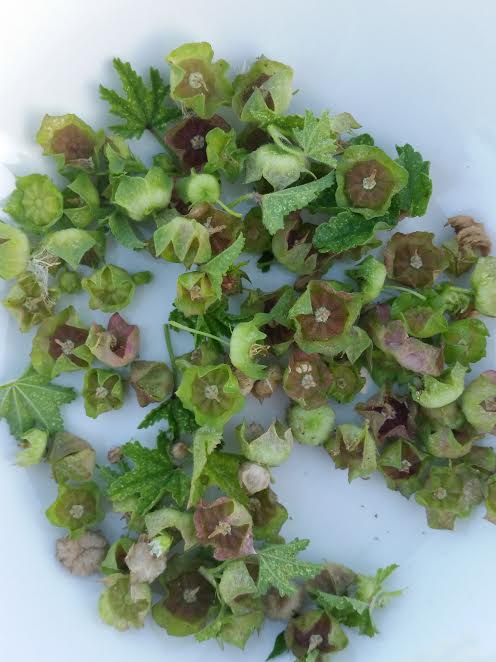
Spotted these mallow seeds in the garden the other day and ate them fresh. I also fried them up for a few minutes with some small mallow leaves in a little b.d farm butter and Murray river salt as a little snack. Pick the seed heads while they are still young and green. They are still ok when turning mauve but once they are brown and dry they are too tough to eat.

There’s a saying in southern Italy ‘La malva da ogni male ti salva’ meaning Mallow saves you from every disease. Mallow has been used extensively across the planet as both food and medicine. In China they have used mallow as a staple vegetable for over 2500 years. The Egyptians and later the french also used the mallow Althaea officinalis to make a marshmallow dessert. This was the healthy precursor to the modern factory made sweet of the same name.

Malva negecta and over twenty other similar Malvas are edible. In the garden it:

  • acts a a nursing plant to seedlings
  • breaks up and aerates heavy clay soil
  • retains moisture in the soil.

The young leaves can be used in salads and older leaves can replace spinach in recipes. Leaves can be added to pesto and green juices. The young green seed heads can be pickled like capers, eaten fresh, added to any salad or cooked dish, or fried in butter and salt and added as garnish to dishes. The root can be used like a potato. The blended root can be used as an alternative to dairy milk. Mallow leaves can be dried and made into tea with a clearer stimulant effect on the body than caffeine. Any part of the mallow can be eaten including the flowers.

Beyond food, older stems and roots of mallow can be prepared into fibre. Soak in overnight and crush the roots, the fibres break apart and can be woven together to make twine. Mallow has also been used as medicine all over the world as an anti-inflammatory, expectorant, anti-bacterial, and an emollient to name a few uses.

Mallow root milk

1 cup mallow root, chopped

3 cups water

1 teaspoon, homemade vanilla essence

1 medjool date or 2 tablespoons of honey

optional – 1/2 cup almonds, soaked overnight

Blend all ingredients and strain. Store in fridge and use in place of dairy milk.


Purslane pesto

puslane

Purslane has been a real revolution for me in the garden. In the hot Adelaide summer it will grow itself and provide a generous crop of crisp nourishing greens that can be eaten raw or cooked. I look forward to it coming so I can add it to stir fries, salads, pesto, and any recipe calling for a leafy green. When adding to salads I tend to strip the leaves off the stems and just eat the leaves as the stems can get tough. When cooking I leave the stems on. Once you identify purslane you will see it growing everywhere. Careful for the poison look alike that drips white sap when you cut it. Purslane has a lovely fresh flavour that is cross between celery and apple. Stick to the purslane growing in your garden or areas you know haven’t been sprayed with poison or dog wee. For this recipe I cut off the top 5 cm of growth stems and all. The flowers and seeds can also be eaten so leave them in when using in recipes.

Purslane pesto recipe

1 bunch basil

Purslane, large handful (Portulaca oleracea)

200gm raw macadamia nuts

1 teaspoon homemade chilli paste (or 1 clove crushed garlic if you prefer)

50ml tamari

100ml olive oil

Add the basil, purslane, chilli, tamari and oil to food blender. I use a little food blender that attaches to my stick blender. Toast the nuts in hot pan for a few minutes. When toasted add the nuts to the rest of the ingredients in the blender. Pulse on low speed until well combined into a paste. Store in clean jar in the fridge.


Ruby salt bush (Enchylaena tomentosa)

ruby-salt-bush

Ruby salt bush is really easy to grow and it’s part of my bush tucker garden out the front yard. It likes full sun and can survive off rain fall once established. While it was growing I pinched out the top growing branch to keep it short as it’s known to be top heavy and can fall over and snap. Mine is a low sprawling 1 metre high shrub.

At this time of year the little red berries are starting to ripen up. To harvest just place a your hand under the branch and tap the berries with your fingers. The ripe berries knock off really easily and fall into your hand. They can be eaten fresh by putting them whole into your mouth and mash lightly between your teeth. Suck the juice then spit out the seed. I don’t break the seed in my teeth as it’s a bit bitter. The flesh has light delicate sweet flavour with an undercurrent of saltiness. Small amounts of the leaves can also been eaten, preferably after boiling to remove some of the oxalic acid.

Ruby saltbush kombucha recipe

A handful of ripe ruby salt bush berries

700ml kombucha

Prepare the first ferment of kombucha like you normally would. Remove your scoby and set aside in your scoby hotel. Prepare the berries by washing them and removing any damaged ones. Place them into a bowl then crush gently with the back of a fork. Put the berries and any released juice in the bottle leaving 3cm of air below the lid. I use a recycled Bickford soft drink bottle for this. Secure the air tight lid on the bottle and place overnight at room temperature in a dark cupboard.

It will gain fizz, a ruby red colour and the delicate sweetness of the berries. I strain the fruit out using a tea strainer and decant into a new bottle and refrigerate. If the berries are left in it will progressively get saltier and lose any sweetness.

Strawberry beer

Our household has developed a taste for kombucha and at $4 a bottle in the shops I’ve had to work out how to brew it at home. A friend lent me the very easy to follow book on ‘The art of probiotic nutrition’ by Kale Brock. It takes you through step by step on how to make kombucha. If you think it’s hard to make just check out this video from Kale to see just how easy it is.

Remove the scoby and place in glass jar with breathable lid and make sure it’s covered with Kombucha. Put the scoby aside in cupboard. With the rest of the Kombucha it’s time to do a secondary ferment.

While local hills strawberries are in season in the shops the varieties in my backyard come through earlier in October, November and into early December. I used about half a punnet for this recipe.

1/2 punnet strawberries

700 ml kombucha

You need a bottle with a nice airtight lid. I recycled a Bickfords soft drink bottle for this.  I mashed about half a punnet of strawberries and placed in the sterilised bottle. Then I topped up the bottle with kombucha leaving about 2 cm of air. I tapped the bottle to get rid of any air bubbles and gave the fruit a little stir to ensure good contact with the liquid. Seal the lid and ferment for 1-3 days depending on the weather. Put it in a cupboard while it’s fermenting. Test each day and put in fridge when ready.

strawberry-kombucha

Be warned, to get the fizz you need to have a small amount of air up top. I left about 2cm and when I opened the bottle to test it, strawberry beer exploded out the top and kinda went everywhere. I’m not sure if it’s because it has been so hot the fermenting process sped up or if I should have left more air up top or I used too much fruit. Probably a combo of all three. The bad news is I lost about a quarter of the bottle. The good news is my ceiling, walls, floors and everything else in the kitchen have now had a good wipe down and I now have delicious fizzy strawberry beer. I didn’t strain the fruit out but if this was being kept for a while in the fridge before drinking I would strain the fruit out.

I have since read that it’s good to open a secondary ferment using a tea towel over the kitchen sink. And… I’ve found out that others find that strawberry kombucha is extra fizzy. I’ll be making this again for sure and making sure I open with tea towel over sink next time.

Dolmades

dolmades

Grape vine leaves are in abundance at the moment and are sending out lots of growth. I’ve seen grape vines growing in lots of public places and it wouldn’t be difficult to forage some. I’m choosing to pick the vines growing over our fence that come in from our neighbours yard because I know they aren’t sprayed. Pick young leaves around the size of your hand for this recipe. Don’t pick any damaged leaves as the stuffing will just fall out. Try to pick in the morning and don’t pick leaves that are providing grapes with shade. Pick one or two lighter green leaves from each branch/shoot from the under story of the vine. Pick the leaves in early summer. Older leaves are tougher, more fibrous and can be bitter.

40 vine leaves

1 tablespoon extra virgin olive oil

1 medium onion

100 gm uncooked basmati rice

50 gm quinoa

50 gm pine nuts

1 teaspoon ground cumin

1 teaspoon five spice

1/2 teaspoon cracked pepper

1/2 teaspoon salt

1/2 cup mint, chopped finely

50 ml lemon juice

600ml vegetable stock or water

enough tomato to line base of pot

Wash the vine leaves and cut off stem with scissors. Blanch in salted boiling water for 30 seconds. Drain and then set aside in a tea towel. The leaves will turn a dull olive green.

Fry the onion gently until translucent. Mix dry ingredients and mint together in a bowl. Add cooked onion. I used whole cherry tomatoes to line the base of the pot. You could also line pot with sliced larger tomatoes.

Place a heaped teaspoon of the stuffing on each vine leave and roll up leaf. Start rolling from base of leaf upwards, then firmly tuck sides in. It’s ok to overlap smaller leaves to get a better rolling surface. Pack each rolled leaf firmly next to each other with the flap of the leaf on the bottom. This will stop it unrolling while its being stacked and while its cooking. Keep adding layers until all the rolls are packed in. Put a plate on top layer of the vines to stop them from moving in the water. Mix the lemon juice and stock and pour over the plate and bundles.

Bring to boil then simmer for 30 minutes. Allow to cool for 30 minutes in the pot before removing.

Minestrone soup

At this time of year I can’t go past whipping up a pot of minestrone soup to get a hit of all the flavours from the garden right now – garlic, bay leaves, parsley, basil, tomatoes, zucchini, silver beet. The recipe changes depending on what in season.

1/4 cup extra virgin olive oil

1 onion

1 red capsicum

4 carrots

4 zucchinis

1 bunch silver beet

2 cups over ripe cherry tomatoes

1.7 litres of stock

1/2 cup chopped herbs (parsley, basil)

2 fresh bay leaves

2 tablespoons red wine vinegar

4 cloves garlic, sliced

1 cup rinsed red lentils

Put pot on medium heat. I chop as I go, wandering in and out of kitchen into garden to find more things to add and this gives time for the vegetables to fry and caramelise a bit which gives extra flavour.  Add olive oil and onions. Dice the red capsicum and add to onions. Stir as you add each ingredient. Peel and dice the carrots, add and stir. Dice the zucchinis, add and stir. Rinse the silver beet, dice and add. Its fine to add the chopped stems. Stir. Get the cherry tomatoes point the hole where the tomato was attached the plant downward. Squeeze the seeds into the pot and twist the tomato and drop it in the pot all in one action. Do this for every cherry tomato. Don’t blend the tomatoes as the broken seeds will add a bitter flavour to the soup. Use your hands for this.

Add stock (I use vegetable), herbs, bay leaves, vinegar, garlic and lentils to the pot. Bring to boil then simmer for 3 hours. This makes the most unbelievably delicious hearty vegetable soup. Serve on it’s own or with sourdough and b.d farm butter.

Muntries aka Kunzea pomifera

I planted some muntries in my front yard in the hope of plentiful summer berries just out my front door. In retrospect they are in the totally wrong spot and it’s amazing they are still alive. The patch has other native shrubs which mean they don’t get a huge amount of sun. Muntries like full sun and sandy soil. Mine have shade and clay soil where they are growing. So they haven’t sprawled out like they do in the wild and they haven’t fruited either. Nonetheless, given that they are content I’ll be leaving them there to see what happens. I’m really keen to have my own supply and will be experimenting with a growing some more up a trellis in full sun later on.

It’s the start of muntrie season at the moment and for now I’ll have to be content to just admire this little patch I came across while down the coast the other day.

Apparently, muntries were traditionally pounded into cakes and dried like fruit leather. These cakes were then traded with other Aboriginal groups for goods. Like any berry they are a delicacy and take time to pick but the taste is well worth it. These would be delicious dried and included in muesli or added fresh to recipes in place of sultanas or berries. They have a crisp apple flavour when fresh.

Huevos rancheros

This breakfast dish is comfort food for me as it reminds me of my childhood, my aunties and my grandmother. This time of year is great for cooking this up as the eggs, tomatoes and spring onions are all collected from my backyard.

2 eggs

2 finely chopped spring onions

1 large overripe tomato or large handful of cherry tomatoes, diced

2 tablespoons extra virgin olive oil

salt and pepper

Put oil in pan on a medium heat. Add spring onions and soften for a minute. Add tomatoes and wait until it starts caramelising. Keep moving around the pan as this should only take a couple of minutes and it will start sticking. Crack eggs whole over the mix and loosely scramble. You still want to see the yolk and the white separate. It will only take a couple of minutes for the eggs to cook through. Season with salt and pepper to taste when serving.

Serve with arepas and baked ricotta. Serves 2.